
There are few things from the kitchen as pretty as a perfectly set jar of sparkling, jewel-toned jelly. However, those “less attractive” jars of jam deserve some love, too.
(All links open a new page, so you won’t lose your spot when you look around! Get information on gardening and cultural traditions, recipes, stories, and more!)
Be sure to follow us on social media! You can also click on any picture to save this post to Pinterest!
One of my issues with making jelly is that it involves extracting only the juice of the fruit being used and not any of the pulp. This wastes a lot of fruit material and takes quite a while to strain out the liquid. Even though we use that pulp in our compost for our garden, I still have a hard time with seeing so much potential food not being consumed. I do still love those picture-perfect jellies, but more often than not I will opt for making jam, instead.

I will admit, though, that some fruits are easier to do this with than others. Like blackberries, another fruit that I love to make jam from, pomegranates have a lot of seeds. Lots and lots and lots of seeds. Pomegranate seeds are not fun to eat and they don’t taste good. How rude.
And let’s face it, getting all those plump arils out of a pomegranate is not the easiest task. Ask my family. Actually, please don’t. I don’t want to hear their complaining any more than I already do. So it really adds incentive to get out as much out of the process as possible to make it all worthwhile. And really, this jam is very worthwhile. Funny, my family doesn’t complain about the part where they get to eat the jam. Hmmmm….

The end result is a preserve that has that delightful pomegranate taste like pomegranate jelly has, but in a fruit butter-like spread. It’s technically a jam because the pulp is not intentionally mashed like in apple or pear butter, but the pulp has a finer texture so it cooks up in much the same way. The robust texture makes it perfect for a classic pb&j sandwich as much as a topping for a buttered slice of toast!
Some quick notes before you begin:
I have created a post that gives all the information needed for those of you that may be brand new to making jams and jellies. It also has tips for those of you who may have struggled getting good results in the past. Check that post out here!
If you are not familiar with canning materials and safety, please read my post on canning here. This gives you an introduction into helpful accessories and resources to make the process easier and safer.
The process for getting the pulp is the same as what I use for making pomegranate jelly (and a second recipe is coming soon! And here it is! ). The difference is that for the jelly, the juice is later extracted from the solids whereas here, everything but the seeds is used.
Pomegranates don’t have a lot of pectin and so the pulp will not gel in the same way as other high pectin fruits. No worries, because this recipe uses the cook-down method to get to the thickness desired. It’s actually easier and less fussy, anyway, and you can even start and stop if you aren’t able to complete the process all at once.
The best type of pot to use for this will be one with a wide base and shorter sides. This will help increase the rate of evaporation of the water from the pomegranate and reduce the time needed to cook it down.
There is a real danger of having the solids settle to the bottom of the pot and get scorched, so this is not a recipe you can walk away from. Regular stirring and using a lower heat will be important to get the results you want.
Since you will be using the cook-down method, you won’t be limited by how much jam you can process at a time like you would be if you were using higher pectin fruits. However, the bigger the batch you make, the longer it will take to thicken and the more risk there is in having the pulp get scorched.
Don’t skip the lemon juice. Not only does it really help to enhance the flavor of your jam, it also provides the needed acidity to prevent the growth of dangerous microorganisms.
Depending on your climate, you could grow your own pomegranates for an abundant supply of this delicious and healthy fruit. The tree is beautiful, too!
Pomegranate Jam Recipe

Directions
To extract the pulp:
For every 1 cup of pomegranate arils, you will need 1/4 cup water. You will want to start with at least three to four cups of the pomegranate arils to get a useful amount, but you can also start with larger quantities. Add both pomegranate and water to a large stock pot. Cover the pot, bring just to a boil, then reduce heat to a low simmer. Continue to simmer until the arils are soft and can be mashed with a potato masher. Strain the material through a food mill to remove the seeds (these can go into compost). The extracted pulp can be kept in the refrigerator or freezer if you don’t have time to finish the jam.
To make the jam:
For every cup of extracted pulp you will need:
- 1/3 to 1/2 cup granulated sugar (use more for tart fruit, less for sweeter fruit)
- 1 1/4 tsp. lemon juice
Put the fruit pulp, sugar, and lemon juice in a tall pot. Bring the contents to a boil, then reduce heat as needed to prevent boiling over and splattering. Stir regularly using a flat wooden paddle to push material off the bottom of the pot to prevent settling and scorching of the solids.
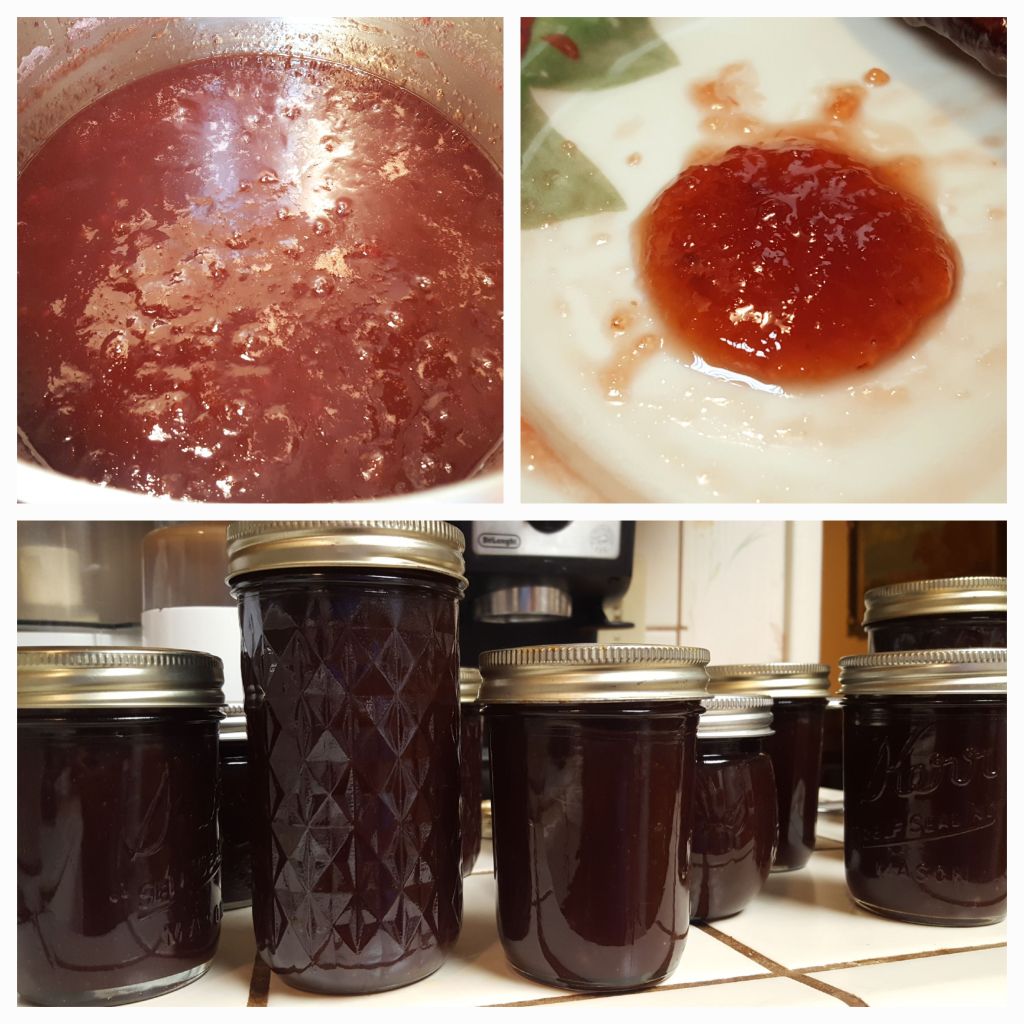
You will continue to cook the pomegranate mixture until it has thickened up to the point that it can be mounded on a spoon. When a spoonful is placed on a cool plate it won’t flatten out much or have a lot of liquid pooling. Keep in mind that it will thicken more as it cools. You can also have a taste (careful, it will be hot!) to see if you would like to add more sugar or lemon juice for flavor.
If you realize that you’ve cooked it down too far, simply add a little water to thin it back down. You can even do this after they have been stored in the jars. Just empty the contents into a pot or microwave safe bowl, add a little water, heat just enough to blend and return to the jar. Just be sure to store that jar in the refrigerator for use.
Once the mixture reaches your desired consistency, carefully ladle it into prepared half-pint jars and cover with clean lids. I will flip each jar over after I cover it to heat all surfaces and air spaces, then flip them back over once all the jars are filled. It is also recommended that the jars be processed in a water bath to ensure proper sealing for long-term storage safety. Now you can enjoy that delightful pomegranate flavor all year!


I’ve attempted this recipe twice. Both times it has burnt terribly, no matter how carefully it is prepared. It’s a shame, because I really would love a good pomegranate jam.
LikeLike
It sounds like you need to turn your heat down and it’s also very helpful to use a paddle type spatula to push the food off of the bottom of the pot. Use it fairly frequently as this cooks.
LikeLike
How long would you process in a water bath
LikeLike
I believe the standard time is 10 minutes at a full boil.
LikeLike
Can you freeze this jam in appropriate containers when done rather than can?
LikeLiked by 1 person
Maybe, but I haven’t tried. I would think it would work?
LikeLike
Yum
LikeLiked by 1 person
I made this the other day. It worked perfectly and tastes great. Thank you for posting this method.
LikeLiked by 1 person
Wonderful!! I’m so glad you liked it!
LikeLike
Hi Dorie,
We have three pomegranate trees in our yard. We usually freeze the seeds and feed them to our squirrels that just love them. The majority we juice with our juicer and enjoy drinking the juice.
My question is – how can I make this jam from just the juice without the seeds?
Thank you!
Cathy
LikeLiked by 1 person
Hi Cathy, I have a couple of recipes for pomegranate jelly that just used the juice. If you type in “pomegranate” into the search bar, you should find both of them. I don’t use commercial pectin for my jellies, instead I use apple pectin. The process is explained in both recipes. I hope you find one you like!
LikeLike
Hello I am trying this recipe but do not have a food mill, will a cheese cloth work to strain the pulp?
LikeLiked by 1 person
its me again, i used the cheese cloth and it worked fine just a little messy. just finished the jam its very tart and hot still but ik it will be so good when i try it later. loved this recipe thanks a bunch ❤ – jess
LikeLiked by 1 person
Sorry I didn’t see your question earlier, but I’m glad that the cheese cloth worked. It is messy, and strains out the pulp which is what makes this a jam rather than a jelly. Hopefully it set for you and comes out tasty! If it is too tart for your taste, you can always increase the amount of sugar in later batches.
LikeLike
Had the same problem as another, it burnt because it never reached the right consistency discussed and pictured. My mistake was not using a food mill (I don’t have one) and still hoping this would set the same as if I used cheesecloth. It’s not the same, and does not have sufficient pectin or the pectin was cooked out trying to boil to the right consistency. I am so insanely angry with myself for the waste of fruit and the full day of prep shelling and straining them. I cannot imagine how this recipe could possibly work for me. There is no way I am talented enough to pull it off. So word of caution to anyone else reading.. maybe check alternatives too because I am not the only one with that result. I think we are misunderstanding something crucial and I’d hate to see anyone else waste all the fruit and effort. Perhaps you can figure out what’s missing.
LikeLike
Additional note (before someone assumes otherwise) I never left the pot. I stood right next to it with a wooden spoon and stirred the ENTIRE time. Heat was on lowest possible setting. I smelt that it seemed to be burning and it was.
LikeLike
I’m so sorry this didn’t work for you! I completely understand your frustration at the lost time and resources. I’ve been there too many times, myself. Something to try differently if you decide to do so, instead of a spoon, use a wooden spatula. The flat edge will move more material off the bottom of the pot and prevent scorching. A spoon only hits the bottom in a small area. Also, you are correct that the food mill makes the difference. This is a jam, not a jelly. Jam uses fruit solids, while jelly is just the juice. Pomegranates don’t have enough pectin to set the juice. Since you used cheesecloth, you strained out the solids that would have allowed this to thicken to a jam consistency. If other people are doing the same thing, then their results would have also differed from what the recipe intended. I do have other recipes for pomegranate jelly that you could try, if you’re wanting that rather than the jam. Just type “pomegranate” in the search bar and they’ll show up.
LikeLike
This is interesting. For a long time I looked for a way to extract the pulp from pomegranate seeds, but didn’t find it. We finally bought a juicer that came from Turkey and have extracted quarts and quarts of juice, some of which I’ve canned. But I will have to try your jam. I wonder if it will work with seeds I’ve already frozen? I often put the arils in salads,breakfast cereal, and/or yogurt, but we have a lot of them! We just finished extracting more juice from pomegranates we left in the basement in November. The outsides got hard and dry and hard to cut open, but the insides are still good. Back to making more jelly and syrup at the moment.
LikeLiked by 1 person
I just bought a juicer, too, possibly the same one, as mine is also from Turkey. This will also work with seeds from the freezer, just make sure they are completely defrosted first to make it easier and less likely to damage your equipment.
LikeLike
Hi,
i just made a tiny batch of pomegranate jam and it came out pretty well, Thanks for sharing the recipe. I’ll have the courage to try a larger batch next time. The color is unbeatable- deep purple and the mixed sweetness of the fruit and minimal sugar is just what I needed to cheer myself today!
LikeLiked by 1 person
I’m so happy you liked it! Be aware that processing more material makes it more at risk of burning on the bottom, so go with a lower heat and stir more frequently to help prevent this from happening.
LikeLike
I also lack a food mill, but I also always crunch the seeds when eating pomegranate, and thus took what I knew to be a risky endeavor of leaving the seeds in for my single jar batch, throwing a bit of extra sugar in for the case of potential bittering agent.
The good news is, it tastes great! The bad news is, even watching it, I severely underestimated just how much it would firm up in the fridge, so by the time my (newbie) eye determined it was piled on the spoon instead of completely running off, it poured beautifully into the jar, and this morning the knife did not pierce my hard candy block.
I have the jar in a hot water bath to melt again and mix more water back, but thought I would share my experience. (And also share that for 2.5 cups of pomegranate, my cook time of about 3 hours was too long)
LikeLike
Oh no!! Well, don’t worry, you’re not the only one to have done that! I’ve had to water down a few batches myself in the past. I’m glad it turned out tasting good. Maybe the cooking will also have softened the seeds so that they aren’t such a problem.
LikeLike