 I have come to embrace the fact that so much of what I make is often in response to having food on the verge of giving up on the world. The thought of wasting food becomes a great motivator to get off my behind and go do something about it.
 I had several oranges and limes from my parents’ garden that were starting to be a wee bit wrinkly. I also had a bunch of lemons on my own tree that needed dealing with. They were all telling me it was time and I finally had to listen.
(All links open a new page, so you won’t lose your spot when you look around! Get information on gardening and cultural traditions, recipes, stories, and more!)
 Any citrus that gets past the point of no return still has a purpose! They are great for helping to acidify soil for plants that require a lower pH. All others become marmalade, a delicious jam that is perfect for buttered toast with tea (how civilized!) or for peanut butter and jelly sandwiches.
 The marmalade making process has a bad reputation. Purists will insist on carrying out a variety of very time consuming and finicky steps. Doing so results in a beautiful product, but if I followed the “rules” I would never make the stuff at all. I have limited time, and very limited patience. Instead, you can use a food processor, or a spiral slicer to speed up the process. If those aren’t options, I also have easy “by hand” instructions, too. You can do it, I have faith in you!
 Some quick notes before you begin:
This process needs to span a couple of days because your citrus pulp will need to soak overnight. Day one will be prepping the fruit, a quick process unless you are doing a lot. Day two is cooking the marmalade, also a quick process unless you are doing a lot. By the way, day two can actually be several days later if you store your fruit mixture in the refrigerator!
Marmalade is best made with either single types of thin-skinned citrus like oranges, limes, and lemons, or any kind of mixture of them. I have found the best tasting ones have some orange in it. Unless you REALLY like grapefruit, I would advise against it due to its very bitter taste.
I have a few options for how to prepare the fruit. The instructions are in the recipe below, so choose whatever works best for you and the equipment you have available.
I have created a post that gives all the information needed for those of you that may be brand new to making jams and jellies. It also has tips for those of you who may have struggled getting good results in the past. I have removed all that information from the original instructions below, just to make things less cluttered. Check that post out here!
If you are new to canning, you should also read my post on Food Canning 101. This goes over the basics of equipment and resources that you’ll find helpful.
Orange Marmalade Recipe
Directions
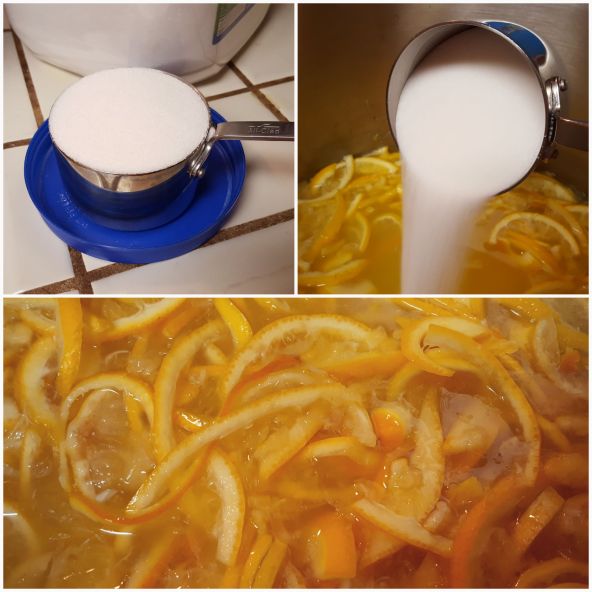
Wash all fruit thoroughly before cutting. For every 1 cup of cut citrus, add 1 cup of water. You will want at least 3-4 cups of fruit (which will make about 8-10 cups of mixture) to make enough marmalade to justify the time spent.For every cup of fruit and water MIXTURE, add 1/2 – 2/3 cup of sugar (the sweeter the fruit used, the less sugar needed). Measure the actual mixture, don’t just double the amount of fruit to figure how much sugar is needed!
Option 1: Instead of peeling the fruit and cutting fine slivers of the rind (the traditional method), I have “cheated” and used my food processor fitted with the thin slicing blade. I cut the unpeeled fruit in half, then cut each half into half or quarters (depending on the size of the fruit), pick out any seeds, then toss each chunk into the processor. The result is a thicker cut of peel than traditionally used, and I would get the occasional big end-chunk depending on how it went through the machine. It still worked fine. Be sure to empty out your processor before it gets too full or the juices will start leaking out from the center!
Option 2: I recently treated myself to a new gadget, thanks to a great Christmas sale. I got the spiralizer/slicer attachment kit for my KitchenAid stand mixer. I used the small core slicing blade with the speed set to 6, and it *mostly* worked like a charm. I got lovely thin slices of peel, but the rind is too soft for the gadget to do the whole thing. So I had to hand cut a small part of each fruit. A few snips with some kitchen scissors took care of it, no problem. By the way, make sure to hold a bowl right below the fruit as it is being sliced, otherwise juice will splatter everywhere! With the KitchenAid spiral slicer, I had long strands of peel that needed to be clipped into shorter lengths. Aim for 2 inch lengths, but there is no need to break out a ruler. Make sure any seeds are removed, then measure the amount of sliced up fruit.
Option 3: If you are stuck doing the old-fashioned route of cutting by hand, the best advice I can give you is to use a serrated knife and a cutting board that has deep tunnels for capturing the juice. Cut the fruit in half, or quarters if large, place the cut side down on the board, then cut the fruit into thin slivers (1/8 inch). Place your slivers into a bowl and occasionally pour off the juices into the bowl with the rest of the fruit.
Put your fruit pulp into a non-reactive pot or bowl, add an equal amount of water, and the desired amount of sugar. Mix all the ingredients together, cover the pot, and allow to sit out overnight. This allows the peel to soften and the sugar to get absorbed.
**You could let this sit longer in the refrigerator if you don’t have two consecutive days to finish!**
 If you are using a standard sized stock-pot, don’t try to process more than 6-8 cups at a time. Your processing time increases too much and you may wind up destroying the pectin in the fruit that helps it gel. It also increases the risk of the material boiling up too high in the pot.
 Turn the heat to high and bring to a boil. Continue to boil, stirring only occasionally to prevent scorching until the temperature reaches 10 degrees Fahrenheit above the boiling point of water for your elevation. For me, I take it off the heat the moment the thermometer reaches 222 F.
If your mixture starts to boil up near the top of the pot, wave your stirring spoon through the bubbles to burst them. You may also want to turn your heat down just a bit if it keeps happening a lot. Resist the urge to stir a lot as that will greatly increase the time it takes to get to your gel point, and may keep your marmalade from setting.
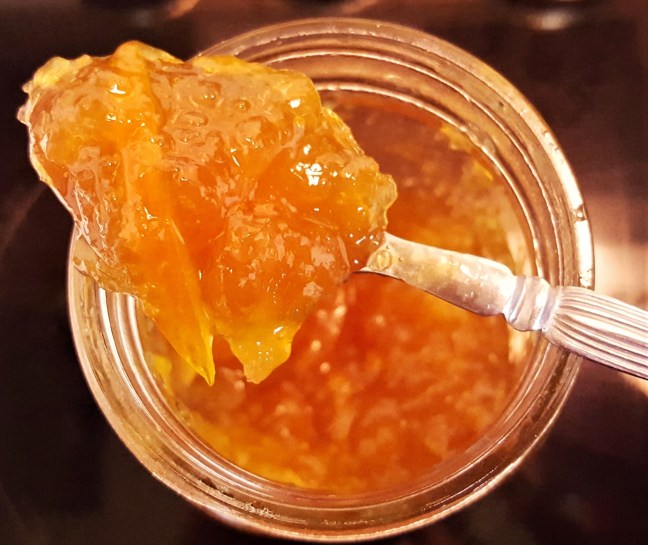
 When your marmalade is finished, carefully fill and cover your sterilized jars one at a time. Fill them to 1/4 inch away from the top of the jar. Put the flat lid on and then the ring, then carefully flip the jars upside down. The heat from the marmalade helps to ensure a sterile surface.
Once you have filled all the jars, carefully (they will still be hot) flip them back over and allow to cool. The marmalade may take a while to firm up, so be patient. Shaking the jars won’t speed it up!
Once the jars have completely cooled, remove the rings and gently test each lid to be sure it is properly sealed. They should resist coming off. Any partially filled jars or jars that didn’t seal should be refrigerated and used right away. Make sure the rims of the jars are clean and replace the rings. Store in a cool, dark place for best results. You may see the top of your marmalade darken over time due to some oxidation, but it is still good. Just be sure to look for any other signs of spoilage. Enjoy!


Oh! I used to grow the ‘Seville’ sour orange when I grew citrus. Of course, we did not grow much of it, and probably all of them were purchased by English people. It is the traditional fruit for orange marmalade. We grew about forty other cultivars, and I know that many of them would make great marmalade, such as the ‘Meyer’ lemon (which is one of my lesser favorite citrus, but works for so much). We also grew the ‘Rangpur Lime’, which is really a sour Mandarin orange. It is acidic like a lemon, with the flavor of a Mandarin orange. I think it would excel in marmalade! Grapefruit were my favorite, but as you mention, would not be good in marmalade, or much of anything else. They are best for eating or juicing.
LikeLiked by 1 person
This one was a combination of your favorite Meyer lemon, yellow ripe lime, but I don’t know which variety, and navel oranges. I once tried to make grapefruit marmalade, before I knew better! I wasted so much sugar on it and still could not get it to taste good! Oh well, the whole batch went into the compost and I’m sure it made a lot of microorganisms very happy! None of us are particularly fond of grapefruit as it is. We had a tree that was growing here when we moved into this house, but it was one of the first trees to go! I figure I might as well grow things I actually want to eat.
LikeLiked by 1 person
I tried to make marmalade with ‘bouquet de Fleur’ bitter orange, which is very different from a sour orange. It was NASTY! Also, a big waste of sugar! The lime that ripens to yellow and looks like a lemon was most likely a ‘Bearss’ lime, which is also the most common lime, although it is related to lemons.
LikeLiked by 1 person
Sounds right on the lime. That’s one that is sold a lot around here.
LikeLiked by 1 person