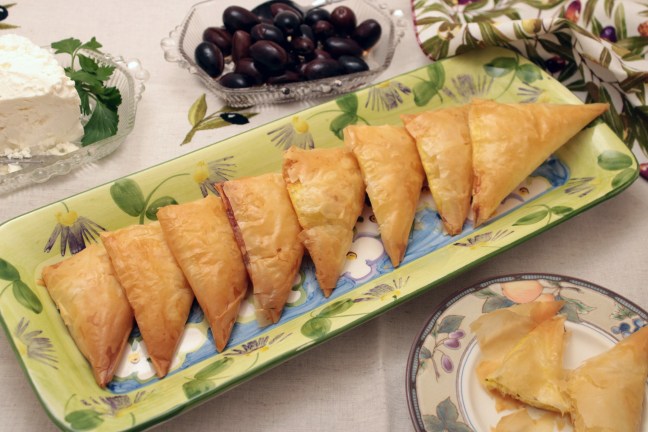
 Think of them as little triangles of pure heaven. Crispy phyllo, tangy feta cheese, and a generous slathering of butter… yes, pure heaven.
 (All links open a new page, so you won’t lose your spot when you look around! Get information on gardening and cultural traditions, recipes, stories, and more!)
Tiropitakia (also spelled tyropitakia and pronounced tee-roh-pih-TAH-kee-ah) translates to “little cheese pie”. It’s a pretty thorough description. They are one of the many quintessential Greek treats sold at bakeries across the country and made for nearly every Greek gathering.
 The combination of taste and texture make them downright addicting. They are typically served hot from the oven, and a tray of them won’t last long enough at a party for them to even get luke-warm. Thankfully they bake up quickly, so if you missed out on the first round, the next will be out shortly. No one minds getting burnt fingers to get to them while they are still piping hot.
 Many recipes for tiropitakia call for an ungodly mixture of multiple cheeses, including several that aren’t even Greek in origin. They may taste okay, but they are no substitute for the burst of flavor that comes from a simple feta cheese filling. Often these recipes were created to use cheaper cheeses as a filler, but with the popularity of feta cheese these days, it is much easier to find and a lot cheaper to purchase. Not only that, but these fillers adversely affect the texture. Stick with the real deal. You won’t be sorry!
Tiropitakia (Greek Feta Cheese Pastry) Recipe
I’ve written this recipe to work with any amount of phyllo you choose. I don’t recommend making large batches of filling all at once since the moisture from the feta will start to leach out into the egg, causing it to become too runny. One batch at a time per person putting these together works very well. The amount of tiropitakia you can make from each batch will vary, but you will get a feel for how much once you get going.
Ingredients
- phyllo dough (you may see it labeled as phillo, fillo, or filo, but it’s all the same)
- salted butter, melted (do not let it foam or brown)
For the filling:
- 1 egg, scrambled
- 3 ounces crumbled feta cheese, use sheep-milk feta for best flavor
- 1 tsp. olive oil (extra virgin preferred)
- 1 pinch dried oregano, Greek preferred (seasoning is optional, but tastes great!)
Directions
If you have never worked with phyllo dough before, read my post about it here. Phyllo usually comes in sheets about 12 x 18 inches, give or take a couple of inches each way. You will want to cut each sheet into strips 3 to 4 inches wide, lengthwise (you want long strips). Set your strips of phyllo in a very lightly dampened towel to keep them from getting dried out.
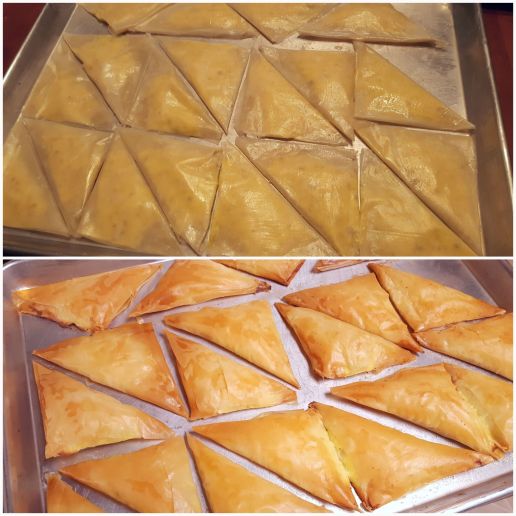
Generously butter a baking sheet. Depending on how many tiropitakia you plan to make, you may need more than one. Tiropitakia can be frozen before baking, so you could place them on parchment paper sheets and freeze. These sheets can be layered on top of each other to save space. Just be sure not to stack too many layers because you don’t want the tiropitakia on the bottom to get squished. You can stack them more once they are frozen.
Combine all the ingredients for the filling in a small bowl. If you have more than one person working at a time, you can make a batch of filling for each person to work with.
When butter is melted, the milk solids will separate out. Be sure to stir the butter each time you dip your pastry brush in to mix the contents. Lay a strip of phyllo on a flat surface and brush the top side with butter. Be sure to completely cover the surface with the mixed butter.
 Put a spoonful of the filling at one end of the strip. You’ll want to be sure not to use too much filling so it doesn’t ooze out, but you don’t want to be too stingy, either. Lift one corner of the strip over the filling so that it aligns with the opposite side, making a pointed end (see the pictures). Now lift the pointed end and flip it over along the straight edge. Be careful to make sure the filling doesn’t ooze out of the sides. Continue flipping the phyllo with the filling over along the edges, until you reach the end and you have a triangle shape. If a little edge is left, just fold it over. It’s exactly like the process used in folding the American flag.
Once you have your little triangle, completely coat it on all sides with more stirred butter. Place each tiropitakia on the buttered baking sheet or parchment paper. It’s okay to place them close together, but don’t allow them to touch. Continue to make more batches of filling and cut more strips of phyllo to make the amount of tyropitakia desired. (By the way, if you have any leftover filling, pop it in the microwave or in a small pan and cook it. Yummy cheesy scrambled egg!)
Once you are ready to bake them, preheat the oven to 350 F. If your tiropitakia are frozen, do not thaw them and only bake one layer at a time. There is no need to transfer them off the parchment paper, just lay it on a baking sheet. Bake them for 25 minutes or until golden brown and crispy on the outside. These are best fresh from the oven, but no one in my home has ever hesitated to eat them at room temperature. They are often served as mezé (appetizers), but they are perfect any time of the day. Enjoy!


These sound amazing! I can almost taste them. Your pictures are on how to assemble are very helpful. The picture of the finished cheese pastries is so lovely.
LikeLiked by 1 person
Thank you so much! I’m glad the pictures are helpful, it is so hard to describe the process!
LikeLike
can i use pastry dough sheets
LikeLiked by 1 person
I know that people have used puff pastry cut into squares and then folded over the filling to make a triangle. It tastes very good, too!😁
LikeLike