 As much as I love making sourdough breads, there are many times that I realize I haven’t prepped my starter in time to do the baking I want or need to do. Bless the person who figured out how to make active dried yeast.
 (All links open a new page, so you won’t lose your spot when you look around! Get information on gardening and cultural traditions, recipes, stories, and more!)
Over the years I’ve bought bread far less frequently because I make so much of our day to day sandwich bread instead. I find the process to be (mostly) relaxing and there are few better smells to waft out of an oven than that of freshly baked bread. However, even though I love the flavor that comes from using sourdough starter, it still requires remembering to feed it in advance. I struggle with that whole “remembering” thing sometimes. So that means it’s a good idea to have an alternate go-to recipe that you still really want to eat. This is the one.
 If you’ve done much in terms of baking yeast breads, you may have noticed that many will use fresh or powdered milk in the recipe. This is because milk adds key components that creates a better bread in terms of appearance, taste, texture, and nutrient content. Milk hydrates the flour better than water does, so the dough comes out softer and more tender, and the milk sugars will give a darker color to the crust as they caramelize during baking. Apparently the fats in milk also help extend the shelf-life of the bread, though I couldn’t tell you if that is true because we eat this up too quickly to know!

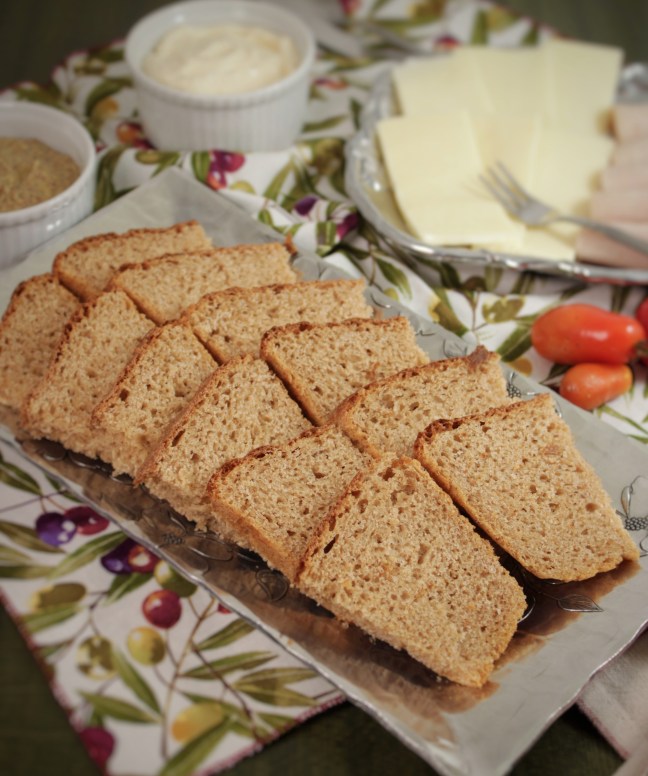
Whole Wheat & Milk Bread Recipe
The quantities below will make two modest sized loaves if baked in a 9 x 5 pan. If you double it, you could make three generously sized loaves instead.
Ingredients
- 1 package active dry yeast (about 2 1/4 tsp.)
- 1/2 cup warm water, no more than 110 F
- 1 tsp. sugar
- 2 cups warm milk (pasteurized milk does not need to be scalded, just warmed to no more than 110 F)
- 1/4 cup olive oil, extra virgin preferred
- 3 1/4 cups bread flour
- 3 1/4 cups whole wheat flour
- 2 tsp. salt
Directions
Dissolve the sugar and yeast into the warm water. It’s okay if the yeast does not completely dissolve at first. Set it aside to allow it to “proof” (activate the yeast) until you start to see some foamy bubbles on the surface.
In a bowl, add the flours and salt and whisk together until combined. I measure flour by whisking it up first then gently scooping it into the measuring cup.
If you’re using a stand mixer, add the yeast mixture, milk and oil to the bowl. Otherwise, mix all the liquids together in a large bowl. Add the flour and knead with the hook or by hand until all the flour is incorporated and the dough comes away from the sides of the bowl. If working by hand, you may need to turn the dough out onto a smooth surface to knead in all of the flour.
When the dough is done it should be smooth but still a little tacky. It shouldn’t stick to a clean hand or surface. Divide the dough into two equal sized portions (or whatever size you prefer). Place the balls of dough into an oiled bowl, turning them to coat the outsides with oil. Cover the bowl with a clean towel and place somewhere warm and draft-free to rise. The oven with the light on is a great place. This will take about 3 to 4 hours.
Allow the dough to rise until doubled. Gently punch the dough down and form into loaf shapes. Place the dough into oiled baking pans and allow to rise again until doubled. This will take about 1 to 1 1/2 hours.
Once the dough has risen, preheat the oven to 425 F. Make sure that you remove the bread while the oven heats if that is where the loaves were rising. Once the oven is heated, place the loaves on a rack placed in the middle and bake for 25 to 30 minutes or until done. The crust will be dark and soft so be aware of that before deciding if your loaves are baked.
Allow the bread to rest in the pans for five minutes and then remove them and place them on a cooling rack. Don’t even think of slicing into them until they are completely cooled to room temperature since the escaping steam will cause your bread to lose moisture and dry out. Be patient. Yes, I know it’s hard. Once the bread has cooled you can eat it to your heart’s content! Enjoy!


Nice!
LikeLiked by 1 person
Thank you!
LikeLike
This looks amazing! My oven is s small (on a sailboat!) so I’d like to make these as rolls. Any suggestions for how long they’d take or how I’d know when they’re done? Thank you!
LikeLiked by 1 person
Thank you! I would say bake for 15 to 20 minutes. You could do the toothpick test by sticking one into the middle of a roll to see if there’s any wet dough sticking to it.
LikeLike
Thanks, Dorie!
LikeLiked by 1 person