 One of the worst things about bloggers on the internet is how frequently “information” is copied and pasted from one site to the next with zero thought put into ensuring that this so-called information is good. I solemnly swear I won’t do that to you.
In my quest to learn more about how traditional foods are made, I’ve come across quite a mixed bag of information. Obviously, there’s no one single recipe or method, as there are regional and family traditions that vary from place to place. Another obstacle I’ve dealt with is that many people write recipes in the same way they were taught: “you put a little of this and a little of that, you wait a little while and there you go.” Not very helpful.
 For me, a big issue is authenticity. It’s typical for people to add their own touches, but sometimes the entire dish is altered to the point that it’s not really the same thing. Added to that is the challenge of finding the same ingredients that would have been used in the village. Some substitutions are acceptable, but for a semi-purist like me, there are limits.
It just so happens that Mizithra is next to impossible for me to find here. Unless I go to my local Old Spaghetti Factory restaurant and order their browned butter and mizithra pasta (which is really good!), I’m pretty much out of luck. I spent quite a while trying to tease out a reliable and authentic recipe from the internet and was able to put together instructions for fresh mizithra. Hardened mizithra, like what that restaurant serves was quite another story.
 This is where the copy-and-pasted information from the internet comes in. Over and over the same vague instructions of how to dry mizithra to the point that it could be grated like Parmesan, without it going moldy or turning into a funky, yellow rock kept popping up. I tried them, and that’s how I know about the moldy and funky yellow rock results. So I dug a little deeper, did a little experimenting, and finally worked out a more reliable, and clear, set of instructions so that you, too, can make your own!
Some quick notes before you begin:
Fresh mizithra is very similar to ricotta cheese, and so the dried versions are similar, too. If you’re familiar with ricotta salata, you have an idea as to what dried mizithra will taste like. It’s salty and tangy, and can be used in all the same ways as fresh grated Parmesan can.
Forget cheese cloth, it’s too open weave, not reusable, and kind of a pain. Muslin cloth dish towels or “tea” towels are perfect for all the parts of this process. You will need to have at least two, but if your laundry cycle is like mine (slow), have three available.
 Be sure to use a salt like sea salt or canning salt. The coarser texture and lack of additives make it better suited for spreading over the curds and create the needed salinity to ward off microorganisms.
My instructions are based on using about 1/2 gallon of cows milk, though there should be no difference with sheep or goat if you can get it. Also, I live in a climate controlled home with low humidity. You may need to adjust your steps to compensate for higher humidity or indoor temperatures above 80 F or below 65 F.
Be sure to keep your hands and surfaces that will come into contact with your cheese clean in order to reduce the chance of spoilage before your cheese is ready.
Homemade Dried Mizithra Cheese Recipe
Directions
You first have to make fresh mizithra cheese. I have two options: the traditional way, and the quick method. Either are suitable. I’ve based the following instructions off of the amount of curds made from 8 to 10 cups of milk.
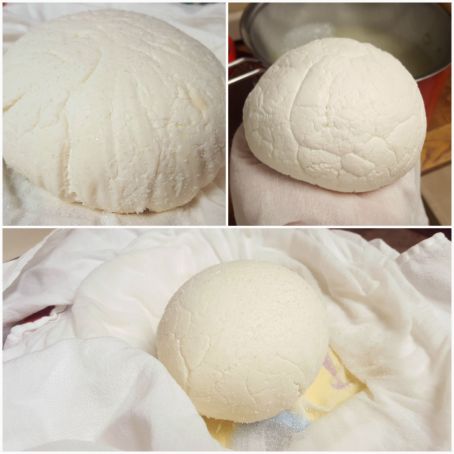
After you have drained the curds and added the salt as described in the recipes for fresh mizithra, and they have cooled enough to comfortably handle, you will transfer the curds to a clean cloth. This is easiest to do by having the fresh cloth draped over one hand and flipping the curds from the first cloth over to it.
With your hands covered in the fresh cloth, mold the curds into a ball. This will help to squeeze out some of the moisture into the cloth around the curds, which is important to have! Open the cloth and rub several pinches of salt all around the curds. Do not shake any excess salt out of the cloth, instead allow it to be pushed around the ball.
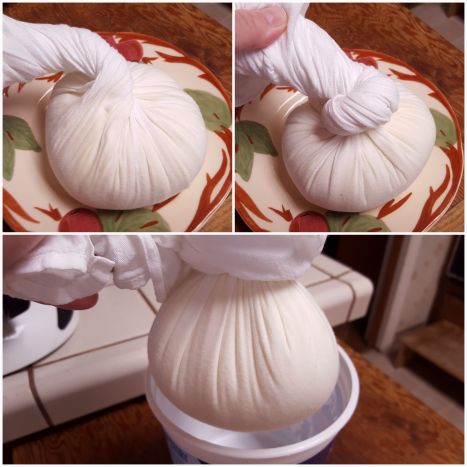
Gather the cloth and twist it around the ball. I like to wrap the ends around a long spoon handle or clean stick and secure it with a rubber band. Hang the ball in a tall container like a pitcher or large yogurt type container. You want to allow the ball to be suspended freely and not touching the sides and have air able to come in from above. Cover the opening with the ends of the cloth, or use another light towel. This will allow air to flow around the curds so that they dry, but will do it slowly so as not to get that hard yellow crust. Set the container someplace where it will not be disturbed or get dirty, but NOT in the refrigerator (it’s too cold and dry at this point).
You will need to rub salt over the curds twice a day for three days (day 1 is the cheese making). Carefully unwrap the cloth and set it on a clean surface, rub on the salt, and re-wrap the ball in the same cloth. Turn the ball over each time to help it keep a round shape. If the cloth has become dry, lightly moisten your clean hand and pat the water onto the outside of the cloth around the ball of curds. You want it lightly damp, not dripping. Put everything back in the container as before. For the next three days (day 4-6) repeat but only salt once a day. If at any time it appears that mold has started to grow, trim off those sections, use a fresh clean cloth, and be sure to use more salt to prevent new growths.
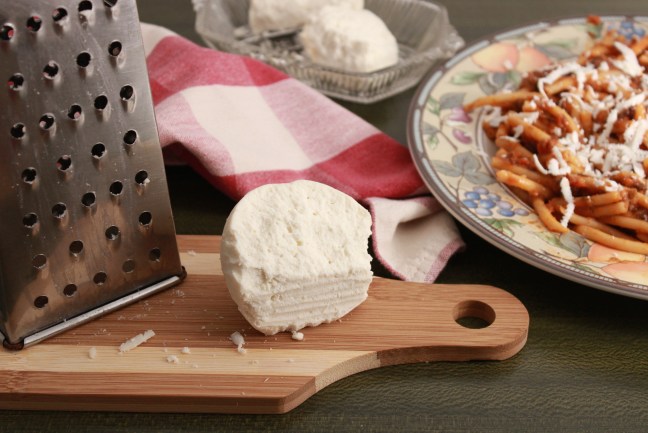
By now the curds should be fairly dry, but may not be quite ready for grating, yet. Place the ball into a clean cloth. There is no need to add more salt, and do not moisten the cloth at this time. Wrap as before and place it in the tub again, but now it’s time to put it in the refrigerator. There is no need to cover the opening of the container. Allow it to sit for a couple of days before checking it. At this time you should have a dry white lump that looks like a moon rock, but tastes pretty darned good!! It should be easy to cut through, with a little bit of crumbling, but firm enough to be grated. It should be stored in a clean container with a lid or wrapped well in plastic wrap. It will last about as long as other firm cheeses. Enjoy!!


Homemade cheese is always better!
LikeLiked by 1 person
So true, I can’t argue with that!!😊
LikeLiked by 2 people
Hello, first time using your recipe, quick question. I just went to do the swap over the cloth and salt, but it’s very much cream cheese consistently so super soft, how do I salt it? Lol I’m in Australia and it’s super hot so I’m thinking this may have something to do with its current consistency? I’ve put it in my bedroom the only a/C room in the house to see if that helps.
Thanks!
LikeLiked by 1 person
You can shake salt over it as best as possible, and as it hangs in the cloth it will harden up as moisture drips out. I’ve had this happen before, too, and you likely just need more time to let it drain out the whey. Hope this helps!!
LikeLike
You have not said how much salt to use and you have not said exactly how long to hang the cheese to get hard.
LikeLiked by 1 person
The initial amount of salt to use is listed in the recipes for making the cheese. These recipes are linked in this post. For rubbing on the outside, use enough to coat it well. Also, the amount of time is given in every step above.
LikeLiked by 1 person